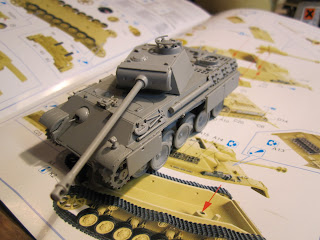
This kit comes with a Die-Cast metal upper and lower hull, which is nicely detailed and adds quite alot of weight to the model. Being a late version this panther does not come with zimmerit applied, but there is parts in the set which you can use to depict an earlier version of the Panther G, parts such as another gun mantle and exaust pipes. I don't really see the point in the metal hull other than adding extra weight, but it does feel nice when you lift the model.
Overall this kit was an exellent build and i acquired another one so i have a Panther platoon, like the rest of my kits i bought it at HobbyEasy.
Assembly
The instructions for this model was quite decent and like most other Dragon kits it's not wireframe instructions but actual pictures, in some cases it can be hard to see where parts fit but it wasn't bad on this kit, if you are in doubt you can always find some pictures on the web to see were parts are supposed to be.
The kit fit together perfectly and from my previous experience with a Panther kit i managed not to mess up the gun mantle this time, so yay me. I decided to cut up the side skirts to depict some battle damage and also because it looks nice. Unlike the other Panther kit i build there wasn't included any PE parts, not even for the engine grills which would have added some nice detail.
Painting
I start by priming the entire model with a red'ish brown, you can also buy the actual shade of red the germans used to prime their tanks before paintjobs, Tamiya got one called XF9 Hull red. After the primer has dried i apply a layer of Tamiya XF60 Dark Yellow, but you can use any sand color basicly, i prefer to use Tamiya acrylics when it comes to airbrushing since they basicly ready to use straight from the pot.
For the camo i usually use a green and brown pattern of some sort, which seems like the most common during WW2, later in the war most german tanks were painted from the factory usually in the "Ambush pattern".
But since the tanks was also painted by the crew for the changing seasons you can basicly get away with painting them however you want. I use XF58 Olive Green and XF64 Red Brown for my camo patterns.
When the basic camo scheme is finished and dry, i drybrush the entire model with a sand color, i usually use Vallejo, Mr.Hobby or Lifecolor acrylics when brush painting because i don't find Tamiya colors suited for that, but maybe it's just me. Anyway after the drybrush i gives the entire model a wash of matt black thinned with water, depending on how much you thin it your model will be more greyed out and abit more dull and not like it just arrived freshly painted from the factory. Letting the wash flow into the creases of the tank it will help make some natural shadows again depending on how much you thinned it.
When the wash is dry i tend to drybrush the tank again to make the details stand out, this time i use either a lighter sand color or a buff color, Vallejo Acrylic 976 Buff is perfect for this job.
After the second drybrush you can glue on the tracks, which i recommend prepainting black (if the aren't already black), and all the tools, wires etc. can now be painted. The tracks i just drybrush with gunmetal together with the edges of the wheels which touch the tracks and probably won't have a whole lot paint left.
When everything have been painted i usually apply some decals to spice up the tank abit, either just turret numbers or perhaps also some battalion decals, or whatever just comes with the kit.
When your decals are in place and dry it is time for the matt coat to protect the paint from wear and tear.
The tank is now finished and looking good (hopefully)
Here are some pictures of the finished model, note i added a bit to the camo schemeso it's more like the Ambush pattern, basicly it's just little dots of sand.
Finished
It went abit better on this Panther compared to the first and this kit is really good, which is aloo why i bought another one. One thing i would have liked was abit of PE-parts to extra detail you can't have everything.


Hi,
ReplyDeleteMore of a question really from a newbie: what adhesive do you use to bond styrene to white metal parts? Is polycement enough? Will superglue melt the plastic parts?
Thanks,
paddypastmaster
I've used superglue, as long as you don't used stupidly large amount I doubt you will have any problem with melting plastic :)
ReplyDeleteAtleast I haven't had any problems what so ever on any of my builds.