

I bought this set together with the Stug III in my previous post, just to try if 1/72 really was anything for me, and i must say it surely is. This kit as all newer Dragon kits is nicely detailed, got fairly good instructions and fits together nicely. This kit is of an earlier Panther G and thanks to Dragons new molding technology we get a perfect layer of zimmerit covering the model, and it looks great (I sincerly doubt i could do i better with putty).
As most of my 1/72 purchases i picked this kit up at HobbyEasy, sadly i think i got the last on in stock, but i bet they will restock at some point.
Assembly
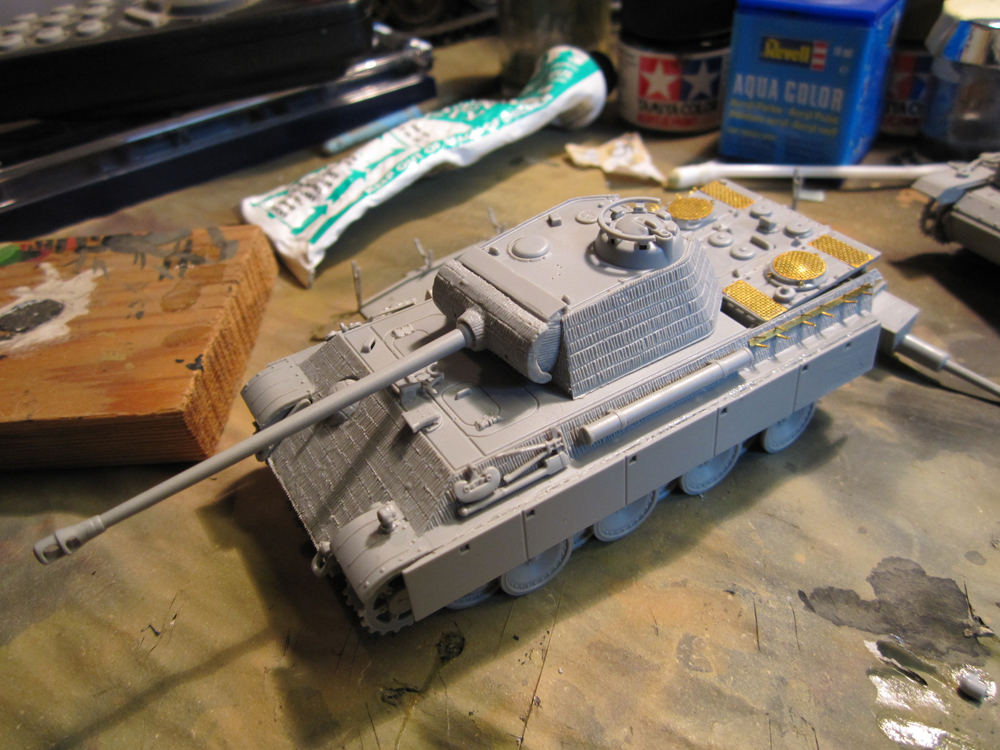 The assembly of this kit was straight forward, everything fits together nicely so there was no real drama, i did manage to fuck up abit when i placed the shield on top of the gun mantle, looking back i should just have let it stay where it was and not tried to rearrange it but i managed to destroy the plactic part and had to replace it with PE part which for some reason was also included in this set (actually this set had quite a few PE parts) and i also managed to damage the turret abit so i had to repair it with putty, it doesn't look perfect but i can live with it.
As i mentioned this set comes with PE parts for the engine grills, the spare track holders and apparently also the gun mantle shield thingy (phew) and it adds some nice detail.
Overall this set was a joy the build and i can recommend it to anyone interested in German Panzer from WWII, especially to people who don't feel like doing the zimmerit themselves, which can be a very time consuming process and i bet it is fairly hard to make it to scale on these small kits.
More assembly photos:


 |
| Compared to my Ferdinand |
Painting
As mentioned in previous posts i basicly use the same technique when it comes to painting as the author of OliveKhakiGrey , which involves painting your models so they stand out on a gaming table, i imagine if you try to paint your small scale kits realisticly they would just end up as a smudgy mass of mud,rust etc. such details i prefer to do on large scall kits where they stand out a whole lot more.
 |
| Primed in Nato Brown |
 |
| Basecoat of Dark Yellow |
 |
| Olive Green and Red Brown stripes |
 |
| Drybrush and wash |
 |
| Drybrush and wash |
I really should get better at documenting the last processes of painting. But when the wash is proper dry it's time for the second drybrush of buff and the camo scheme is now complete. Next comes the detail painting such as tools,wires, rubber rim on wheels etc. the tracks should also be glued on and drybrushed metal.
Finished
The decals on the zimmerit was no succes, but i think i will redo it when i get my hands on a decal softener, which should help immensly (or so i've read).


Awesome kit, abit sad i messed up on the gun mantle, but live and learn next time it won't happen.
No comments:
Post a Comment