Pages

Saturday, July 26, 2014

Panthers - PSC - WW2V15012 - Test vehicle finished


Hello everyone

Yet another small update today. Since I still haven't been able to get any proper work done, I decided I atleast could get the test panther finished. Actually I isn't totally finished since I'm probably going to do a bit of sod on the exhaust with my airbrush at some point, but otherwise I think its basically there.

Nothing much to say about the detail painting really, so I'll just show some pictures of the finished result.


If you have any questions please feel free to post them below :) constructive criticism is always appreciated aswell.

Hope you liked it :)

Chris

Wednesday, July 23, 2014

Panthers - PSC - WW2V15012 - Chipping + Rust - Test


Hello everyone

I've been painting a bit today, but it was simply to hot to do long sessions, so I only managed to do one tanks, which is just going to serve as my test vehicle. I'm trying out a few new things this time. I'm pretty happy with the result, but do feel that it could use a bit refinement. Hopefully the rest of the platoon will be even better. Chipping is never easy and way to easy to overdo, Less is always more, I'm yet to learn this it seems :-p


I used a sponge and a fine brush for the chipping. Before on previous builds I went dark chips first and then sand afterwards to sorta underline them. This time around I did the light color first and then colored in the dark afterwards using a fairly fine brush and a steady hand. I quite like the result, but as mentioned above, it needs some work still I think.

Colors used:
  • Vallejo - Model Color 124 - Iraqi Sand
  • AK Interactive - AK 711 - Chipping Color
  • AK Interactive - Rust Streaks
After the chipping was done I painted some rust streaks from some of the larger chips and around some of the hatches and other details. Then using White spirit (or turpentine, just get an odourless one for gods sake!) and a small flat brush (could use any relatively small brush) I dragged and diluted the streaks. When doing the streaks wipe off most of the white spirit, the brush only needs to be moist, otherwise you will most likely just take it all off. For the 'pools' of rust wash around hatches etc. I didn't wipe of the white spirit, but just used it to dilute the pools to make them blend in a bit. I don't know if that description makes any sense :-p

And voila tank done for now. For this tank all the detail and accessory  are up next. But before I do that I still need to paint 4 more pairs of rubber tires...and a lot more scratches :-p

Until then enjoy some more pictures!


Commenst are more then welcome below.


Chris

Saturday, July 19, 2014

Panthers - PSC - WW2V15012 - Filter & Wash


Hello everyone

Another small update today. Sadly I haven't been able to be as effective as I would've liked...the heat is to blame I think. But I did manage to apply filters and do the shadow/streak wash. Next up is chipping, then details, tracks, pigments, figure and varnish.


I used 2 different filters:
  • AK065 - Afrika Korps Filter, for the wheels
  • AK076 - Filter For Nato Tanks, for the tanks
I'm still not that good at applying filters, the idea is that the surface is just moistened by the filter, it's just supposed to slightly alter the colour and not work as a wash. Practice makes perfect and I will have to keep practicing. I did manage to tone down the colours like a wanted, but might have used to much filter some places.

I thought I would start of by showing how the wheels and tracks currently look, as I haven't posted any pictures of those so far.


As I've done on previous builds I used an enamel wash for the shading (AK-Interactive Enamel Wash for Nato Camo Vehicles), the reason is that I don't have to be careful when doing the wash because the enamel wash dries a lot slower and it's possible to redo/fix mistakes even hours after application using white spirit or turpentine. I try to apply the a fair amount of wash and then after like 30-60 min. go back and do some streaks with the excess and otherwise remove the wash if it has gotten somewhere it shouldn't.

Comparison photo showing before and after wash application.

After the wash had dried I mixed AK711 - Chipping Color & Black (1:1) and the went over places where the wash hadn't reached or had been removed by mistake in the previous step. 


Below is a few shots of the current progress. The pictures are not that good since photo conditions were less than optimal. But I hope they show of the effect of the filter and wash.


That's it for now, hope you enjoyed it. Suggestions and comments are more than welcome below :-)

Stay tuned for next progress report

Chris

Wednesday, July 16, 2014

Panthers - PSC - WW2V15012 - Little Update


Hello everyone!

Small update today.

Yesterday I managed to get a little painting done and also apply the decals to the tanks. The barrels was painting the same way as the tanks using Blu-Tack and didn't take to long to paint. I did mange to fuck one of them up completely so I had to paint strip it, reprime and then paint again, so I thought 'Fuck it' and painted it as a replacement barrel because it was a lot faster.

After the barrels had been glued to the turrets I gave the tanks a coat of Satin varnish, so now they are ready for filters and washes. Hopefully I will be able to get some work done today.


Pictures!

Since the pictures I posted of my old Panther platoon never were any good I took some new ones. Below is one of them just to show the difference between the two platoons (Keep in mind the old panthers were the first 15mm vehicle I had ever painted).

Old panther platoon, still very happy with the result I got!

The new batch of Panthers look more like tanks now that the barrels are on, sadly it will be a while before the wheels and tracks are attached :-p sorry


That's for now, hope you liked it. As usual comments and suggestions are more than welcome below!


Chris

Sunday, July 13, 2014

Panthers - PSC - WW2V15012 - Camoufalge Finished


Evening everyone


So I've been working on painting these (took most of the day....3 tone camo...no fun), and now that the gloss varnish (for decals) have dried I thought I would post some pictures and a bit of info.

Painting

I decided to do a trial run instead of doing all 5 at the same time, just to see how my plan would turn out. So I just selected a Panther at random and went do town with my Blu-Tack.


(Step by step pictures taken with phone, so colours are a bit off)


I started by masking of some lines and then painting green. Both camo colours went trought the same number of steps:
  1. Shadow
  2. Base
  3. Highlight
The colours I used to the Olive Green and Red brown are from the 'AK Interactive German Camouflage' Modulation set. Could have been done with a color, some black and some white as well, but meh :-p


After the green was highlighted, I masked of some more areas and did the same thing with the brown. But before doing so I just gave the tank a coat of varnish, just to make sure the next layer of Blu-Tack wouldn't damage the green color.


No picture of the brown painted, but here's how it turned out :-)


Since I was quite happy with how this turned out, I decided to get the rest done aswell, since I had the time. Doing the masking with Blu-Tack isn't to bad if you are doing like 1-3 tanks, but with 4-5 it gets quite tedious and boring (as I were to find out....) Lets just say the actual painting with the airbrush is the least of this :-p

Below you can see a picture of the production line, the green has just been highlighted and masking for brown was about to begin.


I also did the wheels this time around, I decided not to do a camouflage pattern on the wheels but just solid colours of sand, green and brown. Again I used Blu-Tack for masking the wheels I didn't want painting.

I haven't painted the barrels yet since I wanted to how all the turrets turned out first, so I can sort of match the camo pattern. This is the next painting step, but since I won't be able to get any airbrush work done the next couple of days the actual next step is decals.


Final Result

Here's a couple of pictures of the result of my hard work, gloss varnish just applied so very shiny.


 Now one of the most time consuming parts are over and the weathering and detail painting can begin!

Stay tuned for that.

As usual are comments and suggestions more than welcome below

Chris

Monday, July 7, 2014

US Airborne Platoon - Battlefront - Open Fire - Finished


Helle everyone!

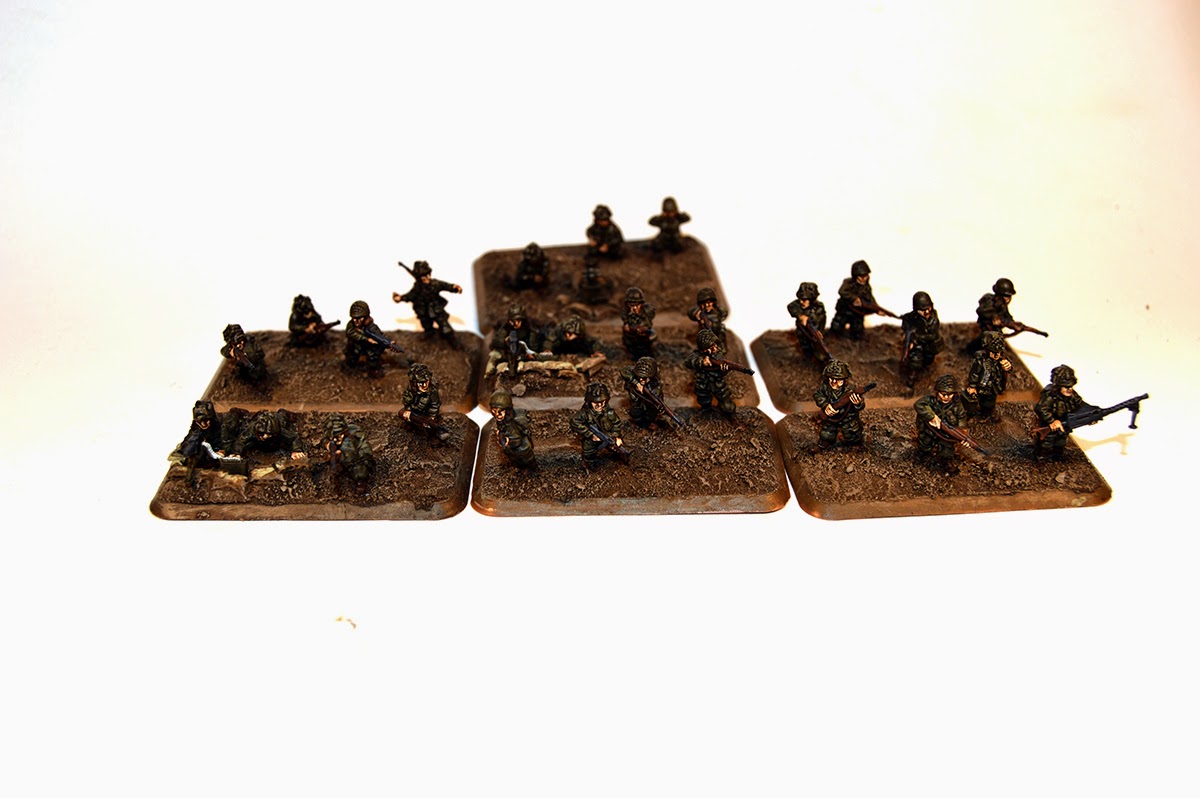
I haven't had the time to really get work done on my Panthers, so instead I finished my Airborne platoon. I'm really happy with the result I managed to get, but I surely was reminded why I play a panzer army :-p god I really don't enjoy painting infantry. Painting 28 figures at once nearly killed me, just painting the base colors was so fucking boring, which I why this took so long to finish.


Base colors painted

I started by doing the bases and then added all the base colors (so took quite a while for me). Afterwards I did a black wash on everything (except the skin). This added some nice fast shadows.

Shading done using a black wash


I then did 2 highlight on all surfaces. First the base color and then base color + white, I like this easy and fairly fast way of painting infantry to a decent standard, it still does take time though.


Overall it was a nice experience painting some allied infantry and I did learn a lot of things, primarily never to prime infantry white.....never. Next infantry project are the panzergrenadiers from the Open Fire set, but got a few other projects I need to do before I will start on these.

Next up are the last 3 shermans and my 5 panthers.


Let's have a few more pictures. (Sorry for a fairly shitty pictures, just got a new camera and really haven't mastered it yet :-p think I might need a better lense for this scale.


Hope you enjoyed reading.
If you have any questions or comments feel free to add them below :-) 


Stay tuned for more.

Chris