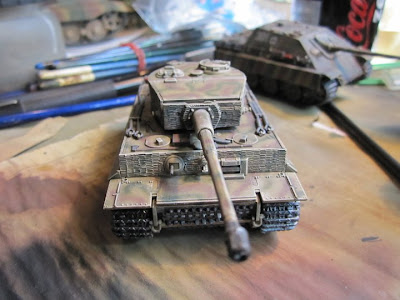
I bought this set at HobbyEasy which is the site i buy most of my modelling sets, paints and tools. They have a very large collection of 1/72 sets, especially WWII. If you can't find what you are looking for at HobbyEasy you can always try LuckyModel, but personally i prefer HobbyEasy.
Well anyway i bought this set mostly just to check out how the dealts level was of Dragon Models Tiger range, they have quite a few to choose from from early to late Tiger tanks, i prefer the late version myself, but at the time i bought this i hadn't seen Dragons Tiger I late production set, which for some reason was listed as a 1/35 kit at the site(I believe this have been fixed by now).
The technique i use when it comes to painting my tanks, is heavily influenced by and awesome site i came across searching for reference photos for camo schemes, the site is called OliveKhakiGrey and the owner Michael is extremely talented, as he himself states on his site he doesn't try to paint his vehicles in a "realistic way" which chipped paint, mud and dirt etc. as you probably normaly would, atleast on larger scale vechicles where details as that looks very nice. His intentions were to make his models stand out on a wargaming table, this means hard highlights and shadows which make the model stand out alot more and the details become more visible, this i think is a nice touch when dealing with small scall kits and it is the same thing i've been doing on my own Warhammer figures.
On his site Michael also got a few nice guides and alot of high quality of most of his figures (ranging from 15mm to 28mm in size).
Painting
I spray paint my models because i think it yields a better result compared to brush painting them (depends on what kind of camo scheme you are trying to replicate of course) and it also require alot less time, but you do need the proper tools. I mostly use Tamiya Acrylics when im using my airbrushes because i like the colors and you don't necesarily have to thin them down to much to use them, compared to other brands. When using Tamiya Acrylics remember to be in a well ventilated room and perhaps even use a mask, since that smell can't possible to healthy :p.
 |
| The model is primed |
I usually prime all of my models with a red'ish brown, since it helps give some natural shadows when the next layer is applied and of course the next layers of paint stick better. When the tanks came of the german production line during the war they were also this red brown color before the they got painted. I think is use a Tamiya color called Nato Brown, but this is only because it was what i had at the time, but it gets the job done. I believe it is possible to purchase the actually hull red color.
 |
| The basecoat of the camo scheme is applied, in this case Dark Yellow |
Next comes the actual camouflage, you can just make shit up or maybe try to find some reference photos or draw inspiration on other peoples work (google images is your friend).
On this kit i tried to do a Normandy 1944 camo scheme, which i probably shouldn't since this is a mid-production Tiger and i don't actually know how common that was on the west front at that time, but luckily i don't really care for such things at the moment.
 |
| Olive Green and Red Brown disruptive pattern |
When the camo is done i drybrush the entire model with a sand color to catch the edges and make the details stand out, afterwards i give the model a blackwash, which gives the tank a greyed out look and the colors would look so new like the tank just rolled of the production line. After the wash is dry i give it yet another drybrush highlight, this time with a lighter sand color or maybe a buff color, doesnt matter much to be honest. When this is done all the detailt on the tank can be painted (tools, wires, machineguns, telescopes, whells, tracks and so on).
Now the tank is basicly done and you can if you like apply some decals or paint some yourself.
As you might notice on the next couple of pictures i forgot to paint the black rubber ring on all the wheels (which have since been corrected) and i will try to add the proper pictures soon.
Overall the kit was very good and it fits together perfectly . Some details such as the muzzlebrake could be better if you want an accurate look, but people would are looking for that could replace the barrel with a more precise metal one which you should be able to find on most large hobby sites.


No comments:
Post a Comment